Points to note when ordering
1)Check it out first -Your basic information and How to Pay-
電話番号(= Phone Number) … We may contact you.
メールアドレス(= email) … We may contact you.
お支払い方法(= How to pay) … ”代引き (= cash on delivery)” or ”クレジットカード(= Credit settlement)”
Not available:
”銀行振込(= Bank transfer)”
”コンビニ先払い(= Convenience store first-come-first-ahead payment)”
”コンビニ後払い(= Convenience store post-payment)”
→ Sorry, We can not explain it well. When you want to use it,Please contact us before ordering.
(2)Glossary and Notes
2-1)File Name
File names can only be alphanumeric characters , “-” and “_”.
(2-2)Paper type
・Please choose the paper to print on.
・クリスタル(=Crystal = Super Gloss)
・プログロッシー(= Glossy )
・プロラスター(= Lustre = Matte Paper)
・おまかせ (= Shop’s recommended)
・We use Fujifilm Professional Paper
→ ナカイの銀塩写真ペーパーの種類と特徴(Differences in print paper and price)
・「おまかせ(Shop’s recommended)」 = は、送信頂いたデータを確認した上で当店が写真に最適なペーパーを選択します。
おまかせ(補正無し)=Shop’s recommended Paper with no retouch … No Stuff retouch & We decide on paper based on the impression of the photograph
おまかせ(補正有り) = Shop’s recommended Paper with shop stuff retouch … We decide on paper based on the impression of the photograph. And Shop Stuff retouch your photos .
※ おまかせプラン(Shop’s recommended) price is same price as Crystal Paper.
Differences in print paper(Youtube)
(2-3)Paper Size
・Choose your photo size
(大全紙、A2、全紙、半切、A3ノビ、A3、ワイド四切、四切、A4、ワイド六切、六切)
※You can set details for each.
2-4)ノートリ(No Trimming)?
・全面プリント(Fulfill)
・ノートリ(No Trimming) = Fit all your data on paper. A margin will be created
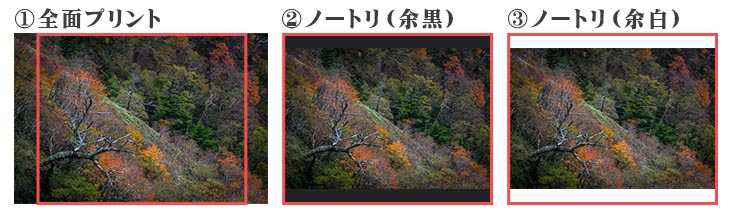
(1)全面プリント = Fulfill
(2)ノートリ(余黒) = Fit all your data on paper. A margin will be created. Margin color is Black.
(3)ノートリ(余白) = Fit all your data on paper. A margin will be created. Margin color is White.
※If you have adobe Photoshop, you can make complete print data.
→ Paper size and aspect and Adobe Photoshop Whitebase(Template)
Web Order ”ご注文”
One order max upload capacity is 400MB.
One order file count is MAX 20.
(1)Preparations
Photographs Data … File name character is only A-Z, a-z, 0-9 , “-” and “_”.
(2)Order
(2-1)Jump to Order Site
・From the menu on this site, press the ”ご注文”.
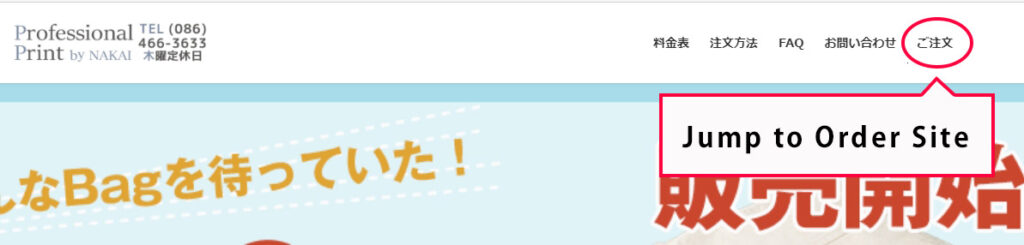
A new tab opens an order-only site
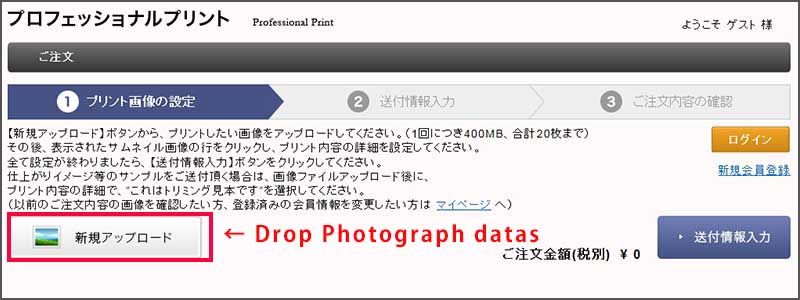
(2-2)Drop or Select Photograph datas
(2-2-1)Sendable extensions
・Sendable extensions
(JPG、JPEG、PSD、TIF、ARW、CR2、DNG、NEF、ORF、PEF、RAF、RW2)
(2-2-2)Drop or Select: In the case of “Select”
・”新規アップロード”(New Upload) Clicked → Choose File
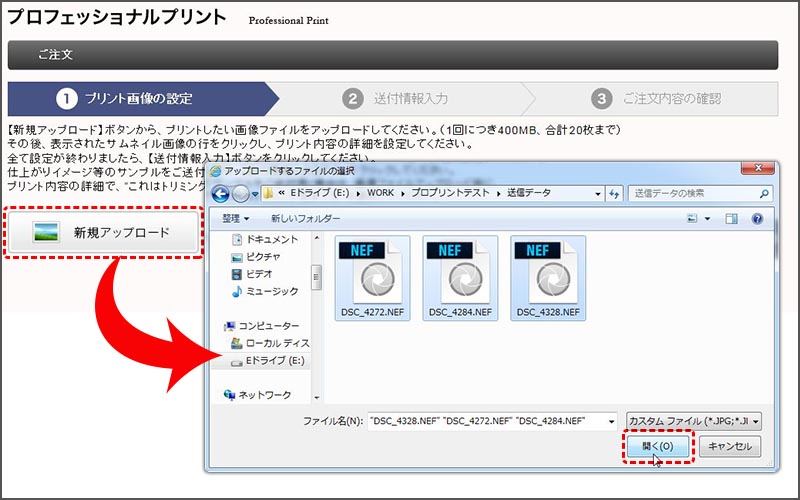
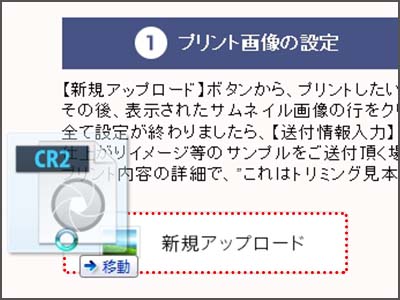
(2-2-3)Drop or Select: In the case of “Drop”
・Drop on ”新規アップロード”(New Upload)
(2-2-4)【If…】All files capacity is over 400MB
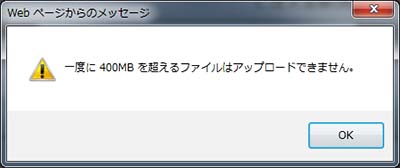
[How to take measures] Please order in two separate times.
(2-2-5)【If…】「xxxxはxxxx_1にリネームしました」
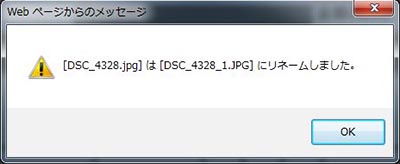
No problem.
Another extension uploaded with the same name.
(2-3)Advanced settings
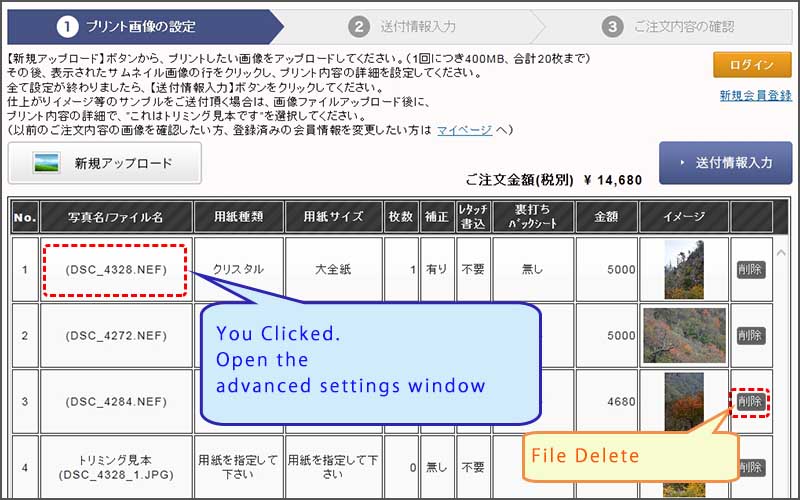
(2-4)Input the advanced settings
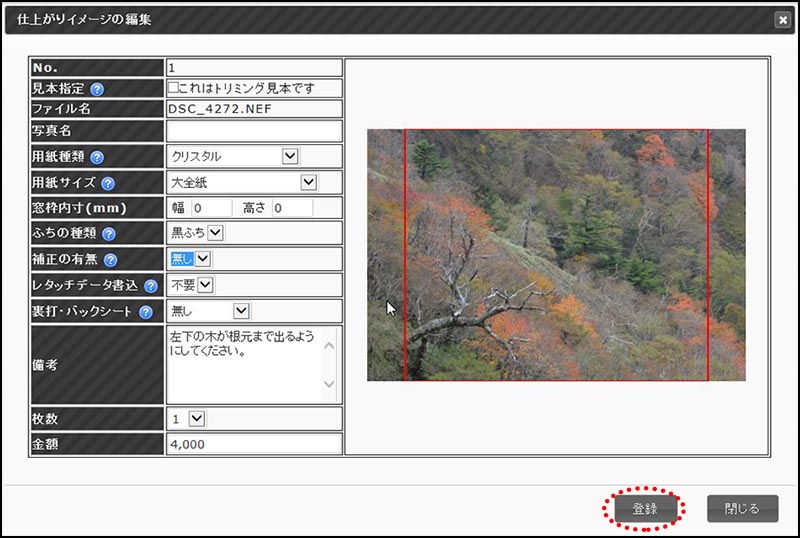
・On this window, Please input almost all items.
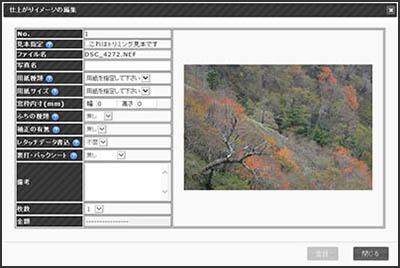
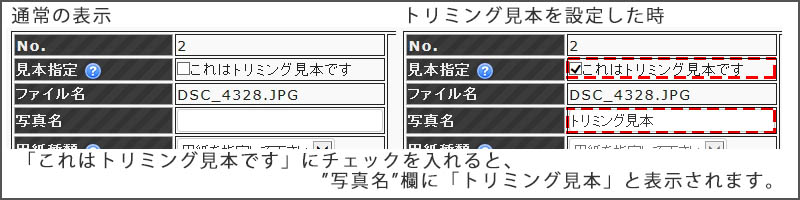
(2-4-1)”No.”、”見本指定”、”ファイル名”、”写真名”
・”No.” … Upload image number. (No input required)
・”見本指定” … If you checked, this image is no printing.Use as a sning.
・”ファイル名” … Upload image file name.(No input required)
・”写真名” … Photo title.
If you want to put a title in the margins, please write the title in this field.
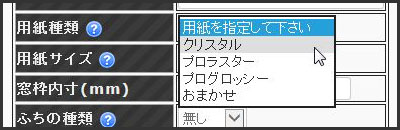
(2-4-2)”用紙種類”= Paper type
・”用紙種類” = Paper Type.
Please select.
・クリスタル(=Crystal = Super Gloss)
・プログロッシー(= Glossy )
・プロラスター(= Lustre = Matte Paper)
・おまかせ (= Shop’s recommended)
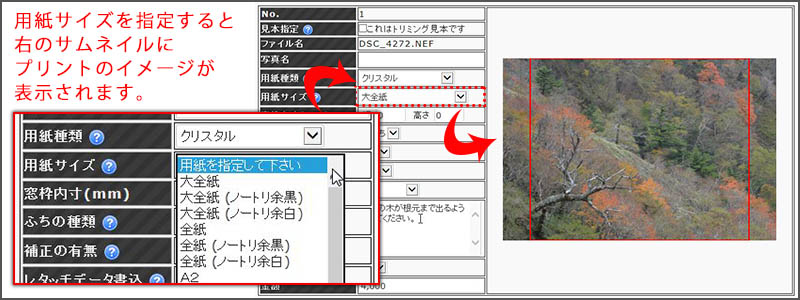
(2-4-3)”用紙サイズ” = Paper size
・”用紙サイズ” = Paper size.
If you wish no trimming, you select [paper size(ノートリ余黒)] or [paper size(ノートリ余白)].
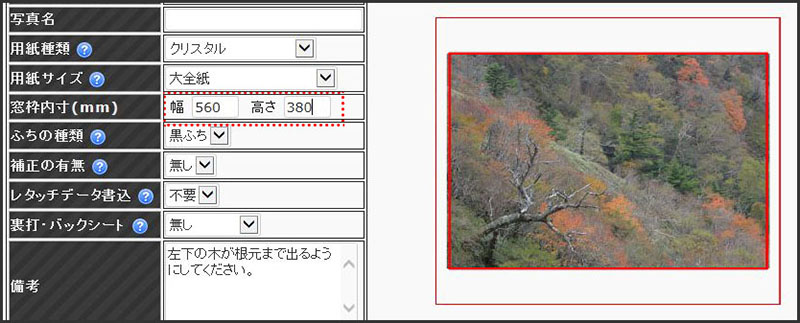
(2-4-4)”窓枠内寸” = If you use picture frame. frame size.
・Print size = Input size + 10mm
(2-4-5)”ふちの種類” = Edge(margin) Type
・”ふちの種類” = Edge(Margin) Type
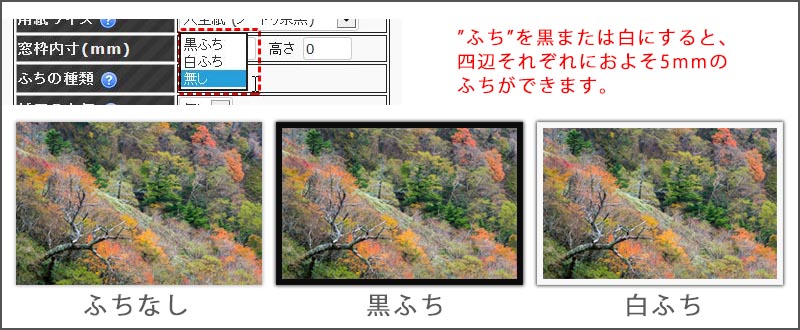
ふちなし = No margin.
黒ふち = Margin about 5mm. All side. with Black color.
白ふち = Margin about 5mm. All side. with White color.
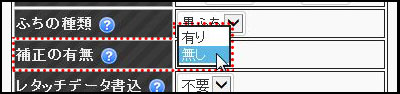
(2-4-6)”補正の有無” = Shop stuff retouch
If you retouched, You select “無し”.
”無し” = No stuff retouch.
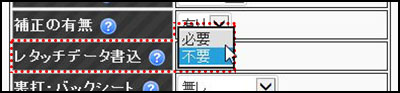
(2-4-7)”レタッチデータ書込” = stuff retouched data
・If you wish to retouch, you can purchase data.(\550)
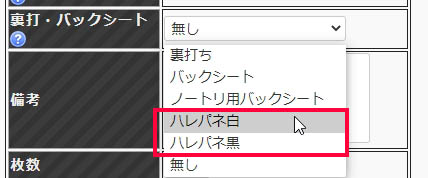
(2-4-8)”裏打ち・バックシート” = foam board (Halle Panel)
If you wish form board (Halle Panel), you select “ハレパネ白” or “ハレパネ黒”.
ハレパネ白 = Use White form board.
ハレパネ黒 = Use Black form board.
(2-4-9)”備考” = remarks
・If you have any hope, please fill in this column.
You had been wanting to cut the margins in the mail. In that case, please write in this field.
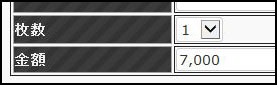
(2-4-10)”枚数” = Number
ex) When you need two prints in one data … ”枚数” = 2
(2-4-11)登録 = registration
・When you have completed all the inputs, please press the “登録” (=registration) button.
(2-5)Advanced settings for all data
・Advanced settings for all data.
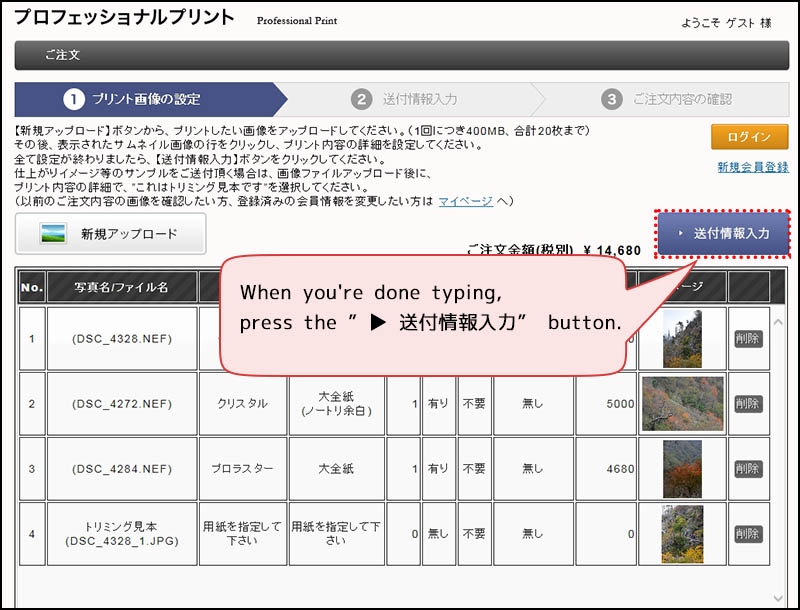
When you’re done typing, press the ”▶ 送付情報入力” button.
※送付情報入力 = Enter shipping information
2-6)Name, Address, Payment method
・Please enter all items except the “建物名” or “備考”.
【Payment method】
”代引き (= cash on delivery)” or ”クレジットカード(= Credit settlement)”
※In the case of “cash on delivery”, A fee is required
print + form board :10,000~29,999 … fee: \528
print + form board :30,000~99,999 … fee: \792
print + form board :100,000~300,000 … fee: \1,320
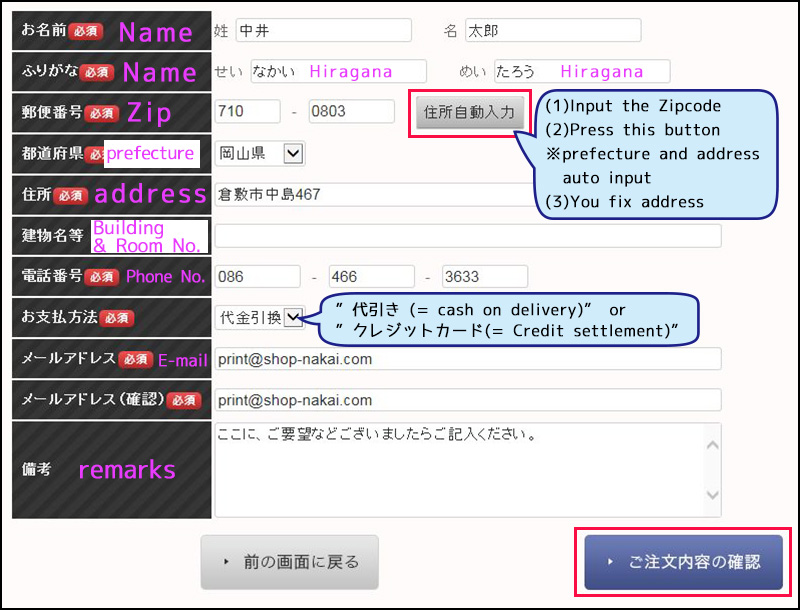
※When all input is finished, press the ”ご注文内容の確認” button.
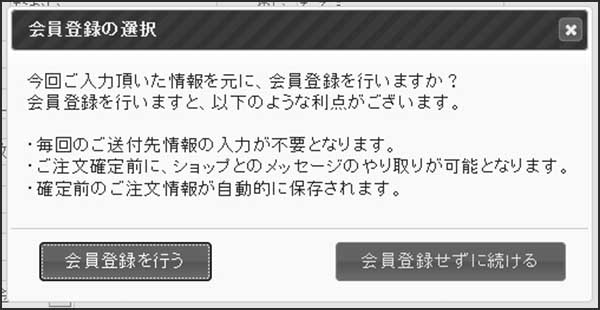
(2-7)Member registration
・If you would like to register as a member, please press the ”会員登録せずに続ける” button.
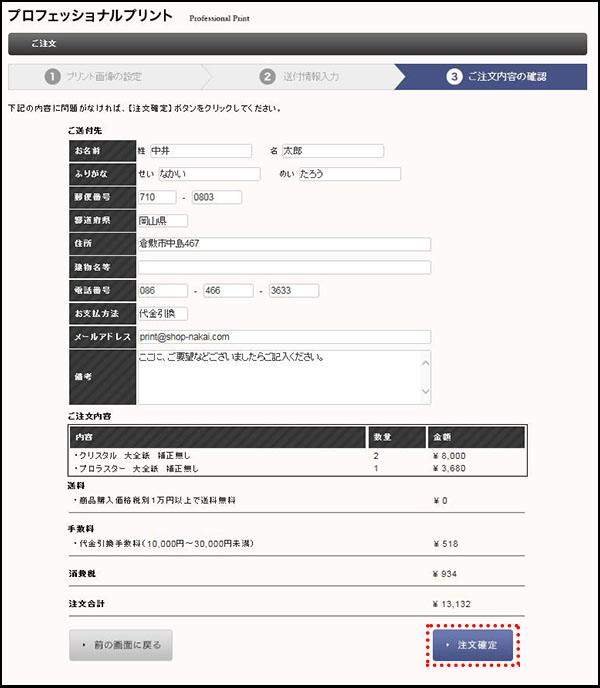
(2-8)Final confirmation
・You make a final confirmation of your order.
If there is no mistake in the content, press the ”▶ 注文確定” button.
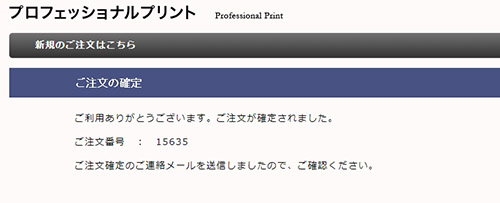
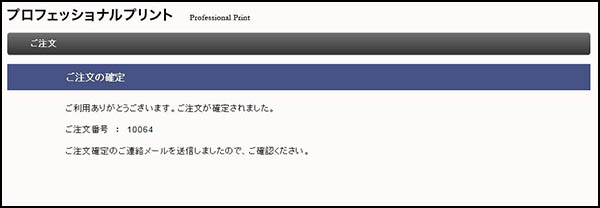
(2-9)In the case of cash on delivery: Done
・When you see a screen similar to the one below, your order is complete.
You will receive an order confirmation email.
【caution】If you don’t receive an order confirmation email, it may be in spam folder.
(2-10)In the case of Credit settlement
(2-10-1)Enter your credit card number, etc.
This site is run by Yamato Financial.
Credit information is not stored in our store
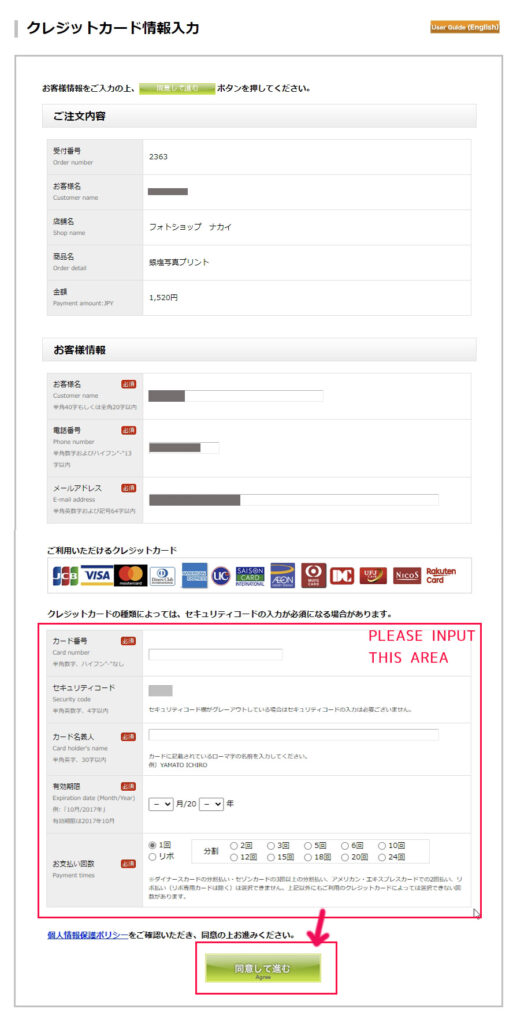
※When you’re done typing, press the ”同意して進む” button.
(2-10-2)Review the credit information you entered.
Review the credit information you entered.
※When you’re done typing, press the ”お支払い手続きへ” button.
(2-10-3)Wait for authentication
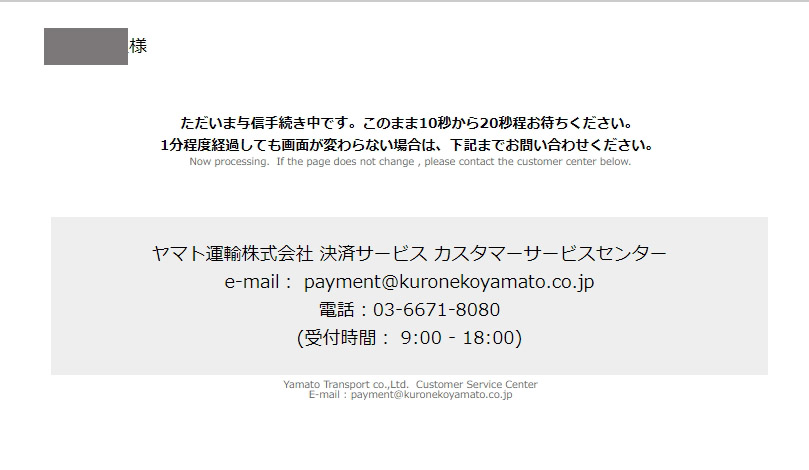
※The screen may vary depending on the credit card company
(2-10-4)Your payment process is complete
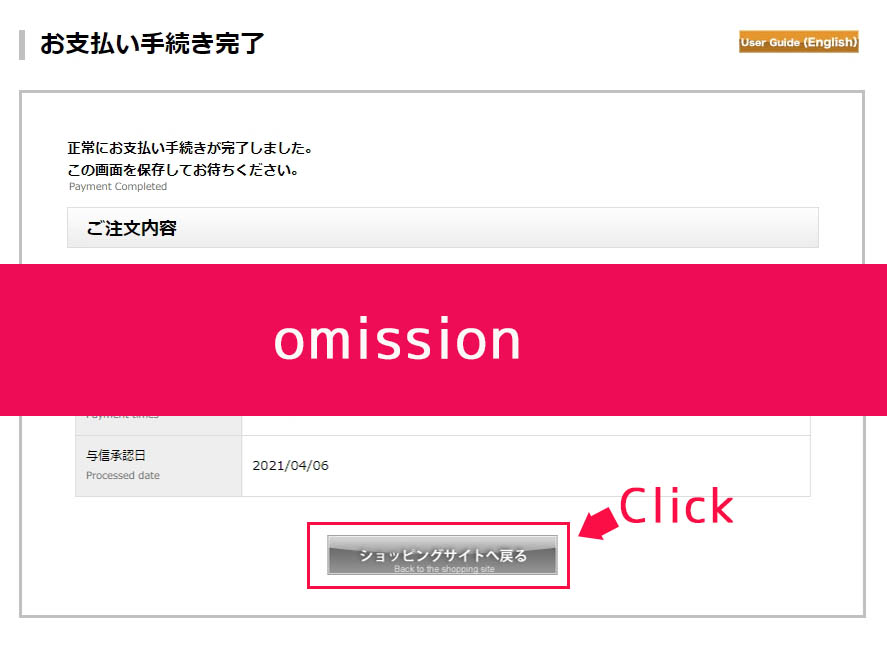
When the payment process is complete, press the ”ショッピングサイトへ戻る” button
(2-10-5)Done
・When you see a screen similar to the one below, your order is complete.
You will receive an order confirmation email.
【caution】If you don’t receive an order confirmation email, it may be in spam folder.